 Save
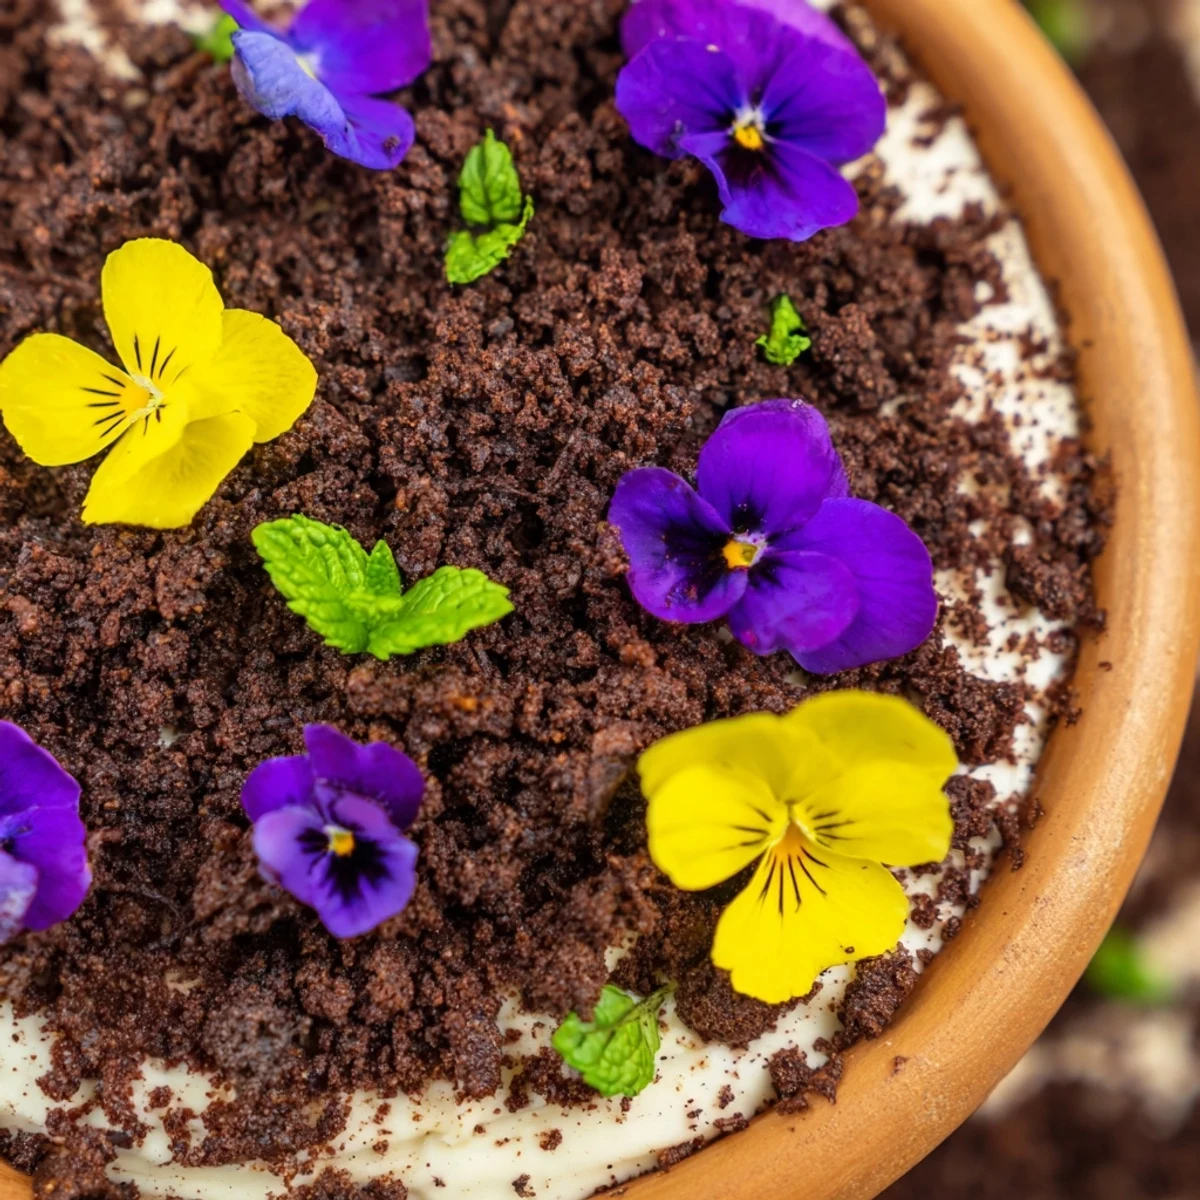
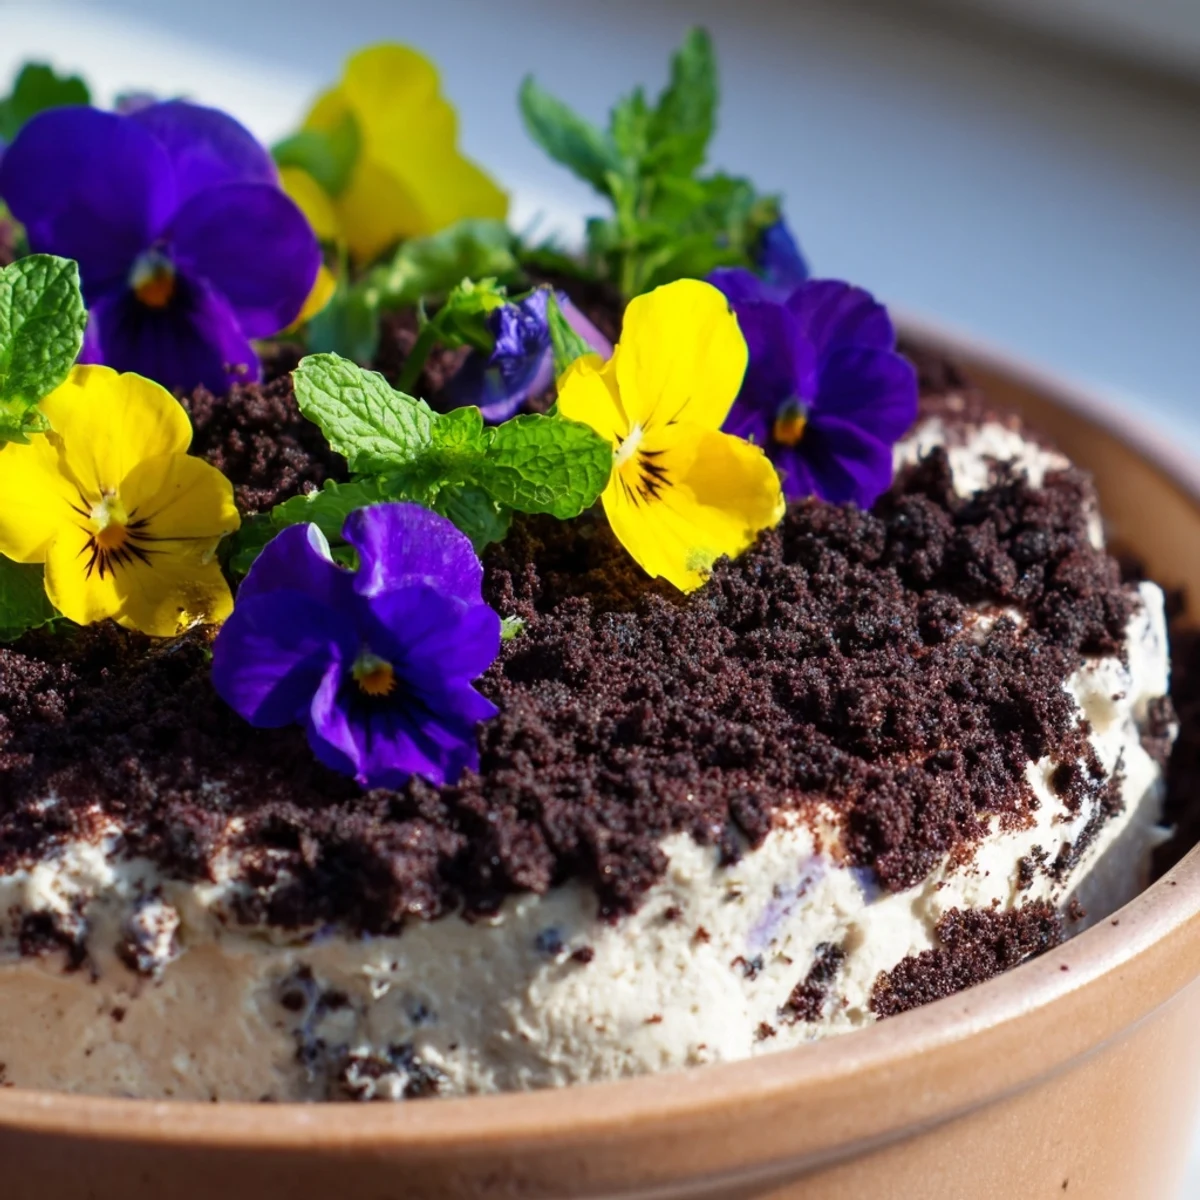
Save This whimsical dessert transforms simple chocolate cake into a stunning potted garden. Rich chocolate cake layers alternate with vanilla cream filling, topped with crushed chocolate cookie "soil" and fresh edible flowers. The result is both visually striking and delicious—perfect for special occasions, spring gatherings, or whenever you want to serve something truly memorable.
Assembly involves crumbling baked cake, layering it with whipped cream filling, and generously coating the top with chocolate crumbs. The magic happens when you add edible flowers like pansies, violets, or nasturtiums, plus fresh mint and herb sprigs to create living garden beauty.
While it looks elaborate, each component comes together quickly. The chocolate cake is a one-bowl wonder, and the cream filling whips up in minutes. Serve in actual mini flower pots for maximum effect, or use clear glass cups to showcase the beautiful layers.
The first time I brought these edible gardens to a dinner party, my friend actually tried to water hers. We all laughed until we tasted them, and then nobody was joking anymore. Now they are my absolute favorite way to end a spring meal, because watching peoples faces when they realize the dirt is chocolate crumbs never gets old.
Last summer I made these for my nieces birthday party and the kids went absolutely wild. They kept asking if they could really eat the flowers, and watching them carefully choose which blossom to eat first was the highlight of the whole celebration.
Ingredients
- 1 cup (125 g) all-purpose flour: The foundation of our cake, providing structure to hold all those moist layers together
- 1 cup (200 g) granulated sugar: Sweetens the cake while keeping the texture tender and light
- 1/2 cup (45 g) unsweetened cocoa powder: Deep chocolate flavor that pairs beautifully with fresh flowers and herbs
- 1 tsp baking powder and 1/2 tsp baking soda: These work together to give the cake a nice rise without making it too dense
- 1/2 tsp salt: A pinch of salt makes chocolate taste more chocolatey, trust me on this one
- 1/2 cup (120 ml) buttermilk: Adds incredible tenderness and a subtle tang that balances the sweetness
- 1/4 cup (60 ml) vegetable oil: Keeps the cake moist and tender for days, much better than butter here
- 1 large egg: Binds everything together and helps the cake rise properly
- 1 tsp vanilla extract: Pure vanilla extract makes the chocolate sing, do not use imitation
- 1/2 cup (120 ml) hot water: The secret trick that blooms the cocoa and makes the cake incredibly moist
- 1 cup (240 ml) heavy cream, chilled: Whips up into the dreamiest cloud-like filling between cake layers
- 1/4 cup (30 g) powdered sugar: Just enough sweetness for the cream without overpowering the flowers
- 1/2 tsp vanilla extract: Another dose of vanilla because you can never have too much in a cream filling
- 200 g cream cheese, softened: Optional but I highly recommend it for a filling that holds its shape beautifully
- 1 cup (100 g) chocolate cookie crumbs: Oreos work perfectly here, crushed to resemble rich garden soil
- 1 cup (40 g) edible flowers: Pansies, violets, and nasturtiums are gorgeous and taste lovely too
- Fresh mint leaves and herb sprigs: Add little green touches that make the garden feel alive and lush
Instructions
- Preheat your oven:
- Get it to 350°F (175°C) and grease an 8-inch square pan, lining the bottom with parchment paper for easy removal later
- Whisk the dry ingredients:
- In a large bowl, combine flour, sugar, cocoa powder, baking powder, baking soda, and salt until everything looks uniformly dark and chocolatey
- Add the wet ingredients:
- Pour in the buttermilk, oil, egg, and vanilla extract, mixing until the batter looks smooth and glossy
- Pour in the hot water:
- This will thin the batter considerably but do not worry, it will bake up perfectly moist and dense
- Bake the cake:
- Pour the thin batter into your prepared pan and bake for 25 to 30 minutes until a toothpick comes out clean
- Let it cool completely:
- This is crucial because warm cake will melt your cream filling, so be patient and let it cool to room temperature
- Make the creamy filling:
- Whip the cold heavy cream with powdered sugar and vanilla (and cream cheese if using) until you have medium-stiff peaks that hold their shape
- Crumble the cake:
- Break the cooled cake into small irregular pieces, some finer and some chunkier for interesting texture
- Assemble the gardens:
- In small flower pots or clear dessert cups, layer cake crumbs followed by cream, then more cake, finishing with chocolate cookie soil
- Plant your garden:
- Arrange the edible flowers, mint leaves, and herb sprigs in the cookie soil however makes you smile
- Chill before serving:
- Thirty minutes in the fridge lets the flavors meld and makes assembly much more stable
 Save
Save My mother serves these at her spring luncheons and watching elegant ladies carefully eat their way through a garden is always the best part of the afternoon. It reminds me that food should be playful and bring joy, not just sustenance.
Choosing Your Flowers
Not all flowers are created equal when it comes to eating them. Pansies have a mild, slightly grassy flavor that works beautifully with chocolate, while nasturtiums add a peppery kick that surprises people. Violets are delicately sweet and look like tiny jewels nestled in the chocolate soil. Always buy from trusted sources or grow your own without chemicals.
Make-Ahead Magic
The cake layers freeze beautifully, so I often bake it days ahead and crumble it straight from frozen. The cream filling can be made a day in advance and kept covered in the refrigerator. Just wait to assemble and add the flowers until a few hours before serving, otherwise they might wilt or lose their fresh appearance.
Serving Suggestions
Clear glass cups show off the beautiful layers and make the soil reveal even more dramatic. For outdoor events, small terracotta pots feel authentic but always include a small spoon or fork so guests know how to eat it. I like to place a tiny sign saying edible near the display because people really will not believe they can eat the flowers.
- Keep extra cookie crumbs nearby for guests who want more dirt
- Have a list of flower varieties available for curious guests
- Small tongs or tweezers help with precise flower placement
 Save
Save There is something deeply satisfying about eating dessert that looks like a garden, especially when the contrast between appearance and taste is so delightful. These little pots of joy never fail to spark conversation and happy surprise around the table.
Recipe FAQs
- → Which flowers are safe to use for decoration?
-
Pansies, violets, nasturtiums, calendula, and borage are excellent edible choices. Always purchase from sources that specifically grow flowers for consumption to avoid pesticides. Never use flowers from florists or garden centers unless certified edible.
- → Can I make components ahead of time?
-
Bake the chocolate cake up to two days in advance and store tightly wrapped. Whip the cream filling the same day you assemble for best texture. The completed pots hold beautifully for several hours refrigerated, making them ideal for entertaining.
- → What container works best for presentation?
-
Small terracotta flower pots create the most dramatic effect—line them with parchment or use food-safe versions. Clear glass dessert cups or mason jars also showcase the layered beauty. Both work equally well for serving and chilling.
- → How do I achieve the right soil texture?
-
Finely crush chocolate cookies in a food processor or place in a sealed bag and roll with a rolling pin. Oreos work perfectly, or use any chocolate sandwich cookie. The crumbs should resemble rich garden soil for the most realistic appearance.
- → Can I substitute the chocolate cake?
-
Any firm cake variety works—vanilla, red velvet, or even brownies. Just ensure it's fully cooled before crumbling. The key is texture that layers well without becoming mushy when combined with the cream filling.
- → What flavor variations work well?
-
Spread berry compote between layers for fruity contrast, or add lemon curd for bright notes. Try chocolate mousse instead of whipped cream, or mix crushed toasted nuts into the soil layer for extra crunch and flavor dimension.
